by Sandy Garland

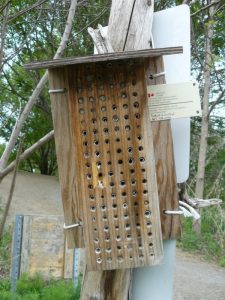
A well-designed, easy to clean bee box that may be used by a number of species
Providing nesting sites for bees involves more than just drilling holes in a piece of wood, but it doesn’t have to be difficult. Here is some information based on our experience at the Fletcher Wildlife Garden, where we maintain a number of bee boxes as well as an insect hotel.
Best box design
We inherited 3 excellent boxes that AAFC researcher Sophie Cardinal had been using to inventory bees in the region. Their design not only makes them practical, but also easy to clean.
- Start with a 6” by 6” block of wood, about a foot long. AAFC’s boxes are 16” long, but any size will work.
- Cut one end at an angle so that the roof will be sloped toward the front of the box.
- Drill holes of various sizes all the way through the block. Long drill bits are very expensive. When faced with making our own boxes, we purchased 1/4-inch and 3/8-inch wood bits, but this limits the number of species using our boxes. Consult your local high school, as it may have a well-equipped wood-working shop and students might be happy to help with your project. It really is important to make the holes at least 4” deep as we find that many bees use only the deepest part of the tunnels.
- Fasten a piece of quarter-inch plywood to the back of the box; it should be the height of the back of the block, but 10” wide so that it sticks out about 2” on both sides.
- Make a roof out of the same plywood (8” by 10”) and mount it so that one of the long sides matches the back board and the front overhangs the wood block by a couple of inches. This will help keep rain off the front of the box and keep the nesting tubes dry. Note: Summer 2017 was a particularly wet year and many of our bee tubes got wet, especially those near the bottom of the wood blocks. It may be better to make several smaller boxes, possibly with a larger overhang to keep all the tubes dry.
- Line holes with parchment paper by rolling tubes around small dowels, pencils, round skewers, etc., to get the right sizes. Although this step is tedious, it makes cleaning and maintenance much, much easier. AAFC used parchment and we’ve continued that practice, although other paper types would do. For example, we use recycled typing paper for our mason bee tunnels, with great success.

Lined tunnels used by a Mason Bee (left) and a Leaf-cutter Bee (right)
Alternative designs

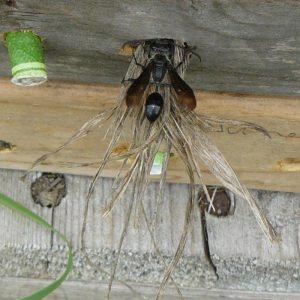
Be prepared to host wasps in your bee box as well as bees. This Grass-carrying Wasp (Isodontia mexicana) is frequently seen in ours
Hollow plant stems can also be used, and may provide a more natural alternative to tunnel-nesting bees. We have used Day lilies, Cup-plant, and Wild Parsnip for this purpose. Cut the stem sections to about 8 inches long. Tie the stems into bundles of about 20. Arranging stems in bundles makes it easier for bees to locate the tunnel they were filling. Each bee has to make many, many trips to bring material and food to construct and stock the tunnels, so helping them spot their own tunnel saves time and energy.
At the FWG, we learned to make mason bee boxes out of paper tubes and milk cartons. These have been a great success and you’ll find instructions here.
Although bees seem to prefer deep tunnels, they will also use holes drilled into the side (not end) of a 2″ by 6″ block. Line the tunnels with parchment to make cleaning easier, or simply replace the blocks each spring, being careful to leave the old ones out where emerging bees will find food.
When to clean or replace
Bees that use plant stems or holes in wood have various life cycles, but many overwinter in those tunnels and emerge in spring. But the boxes must be cleaned annually to prevent disease and reduce mould and parasites.
We take down our boxes in the fall, remove the parchment or paper tubes, put the used ones (containing bee larvae or adults) into the refrigerator for winter, then clean the boxes and line the holes with fresh parchment.
If you use plant stems, put out new bundles every spring. The current year’s bundles can be left in place over winter or kept in a refrigerator and put outside in spring near the original location so the bees can find food.
References
FWG: Bee boxes, house, condos, and hotels
Xerces Society